
Installation

Step 2: Clear weapon. Remove magazine if one is present. Visually inspect the chamber to ensure that no ammunition remains.

Step 3: Remove top and bottom hand guard.

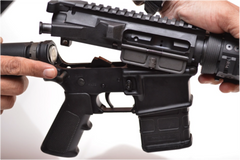
Step 4: Push both pivot-pin and takedown-pin left to right until stopped by the detent. Separate upper from the lower receiver.
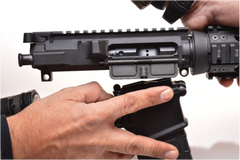
Step 5: Remove the bolt carrier and charging handle from the upper receiver.

Step 6: Using a 1/16 punch and hammer, remove gas tube roll pin from front sight tower by firmly driving the roll pin out of front sight tower and discard pin. DO NOT use original roll pin with the Osprey system.

Step 7: Remove gas tube using gas tube removal tool or padded pliers by pulling rearward towards the upper receiver.

Step 8: Clean gas tube hole in front sight tower with a .22 caliber bore brush to remove old carbon build up, then install the piston chamber. Chamber must be fully inserted into front sight tower. The hole in the front sight must align with the hole in piston chamber tube using your 1/16 punch as a guide. (Punch should simply assist with alignment of 2 parts)

Step 9: Hold weapon securely in pin removal/installation block. Install groove pin, using your 1/16 punch and hammer, into the sight tower hole, which will secure piston chamber to front sight tower.

Step 10: Insert op-rod assembly by inserting through gas tube path in the upper receiver. Make sure to rotate op-rod assembly FLAT SIDE DOWN for appropriate clearance during installation.

Step 11: Clean out the hole in the forward-end charging handle track. Install bushing into the upper receiver at the forward end of the charging handle track. Use the op-rod assembly to align bushing and a light brass hammer to tap bushing into the upper receiver until it is fully seated. DO NOT install it in the chamber.

Step 12: Insert piston into the piston chamber.

Step 13: Rotate op-rod assembly FLAT SIDE UP and engage with the piston. Lock parts in place with retaining clip through left side and clip UPWARD. Make sure the op-rod is not too abrasive against the barrel nut.

Step 14: Remove bolt from bolt carrier, carefully remove and discard 3 gas rings. They will not be needed in the conversion.

Step 15: Place the bolt into the Osprey bolt carrier. Lubricate with high-quality rifle lubricant.

Step 16: Lubricate and reinstall the charging handle and bolt carrier assembly into the upper receiver.
Step 17: Reassemble upper and lower receivers. With the rifle closed and the bolt in closed position, the piston assembly should have approximately 1/16 of an inch of forward to rear travel.
Step 18: Charge the rifle several times and check for function. Bolt carrier movements should be of normal resistance.
Step 19: Reinstall top and bottom handguards or rails.
Check the bolt carrier for smooth operation and you’re finished! Enjoy your new Osprey Gas-Piston System!